
How to set up your first Talent Pools
Your first talent pool doesn't have to be complicated. It just has to capture the right people before you lose them.

Article
6 min
October 23, 2025
2 of 5
parts
Your first talent pool doesn't have to be complicated. It just has to capture the right people before you lose them.

You're likely familiar with the frustration of losing track of good candidates.
You get to the end of a hiring process with two or three strong candidates, you can only hire one, and the rest disappear into the system.
Then six months later, when a similar role opens, you’re back to posting ads and sifting through hundreds of applications instead of reaching straight for the people you already trust.
That’s exactly what Talent Pools are designed to fix.
When set up properly, Talent Pools give you an organized, reliable place to keep great candidates and bring them back quickly when new roles open. In fact, across our enterprise customers, teams using Talent Pools in Pinpoint have seen an average 35% reduction in time-to-hire in the past six months.
But the key phrase here is “set up properly.” Pools that are messy, inconsistent, or poorly structured don’t get used, and when they don’t get used, they don’t deliver value.
This guide will walk you through setting up your first two or three Pools in a way that works.
By the end, you’ll have:
We’ve seen firsthand that if you get this right from the beginning, you’ll never waste time rebuilding pipelines you already have.
Before you start creating any Pools, it’s important to understand that in Pinpoint, tags are what make Talent Pools automated.
Tags are the way the system recognizes and automatically groups candidates. Every condition, every Pool rule, every search, it all depends on how well you use and manage tags.
If your tagging isn’t consistent, your Pools will quickly become unreliable. So, before you build anything, take a few minutes to get your tagging framework in order.
Tags are flexible labels you can add to candidates based on anything that matters to your hiring process, from skills, location, and department to hiring stage, source, or campaign.
When you create a Talent Pool, you can tell Pinpoint to include anyone with specific tags (for example, Sales + London), or to automatically add people who meet several conditions (for example, Tag = Silver Medalist + Location = London).
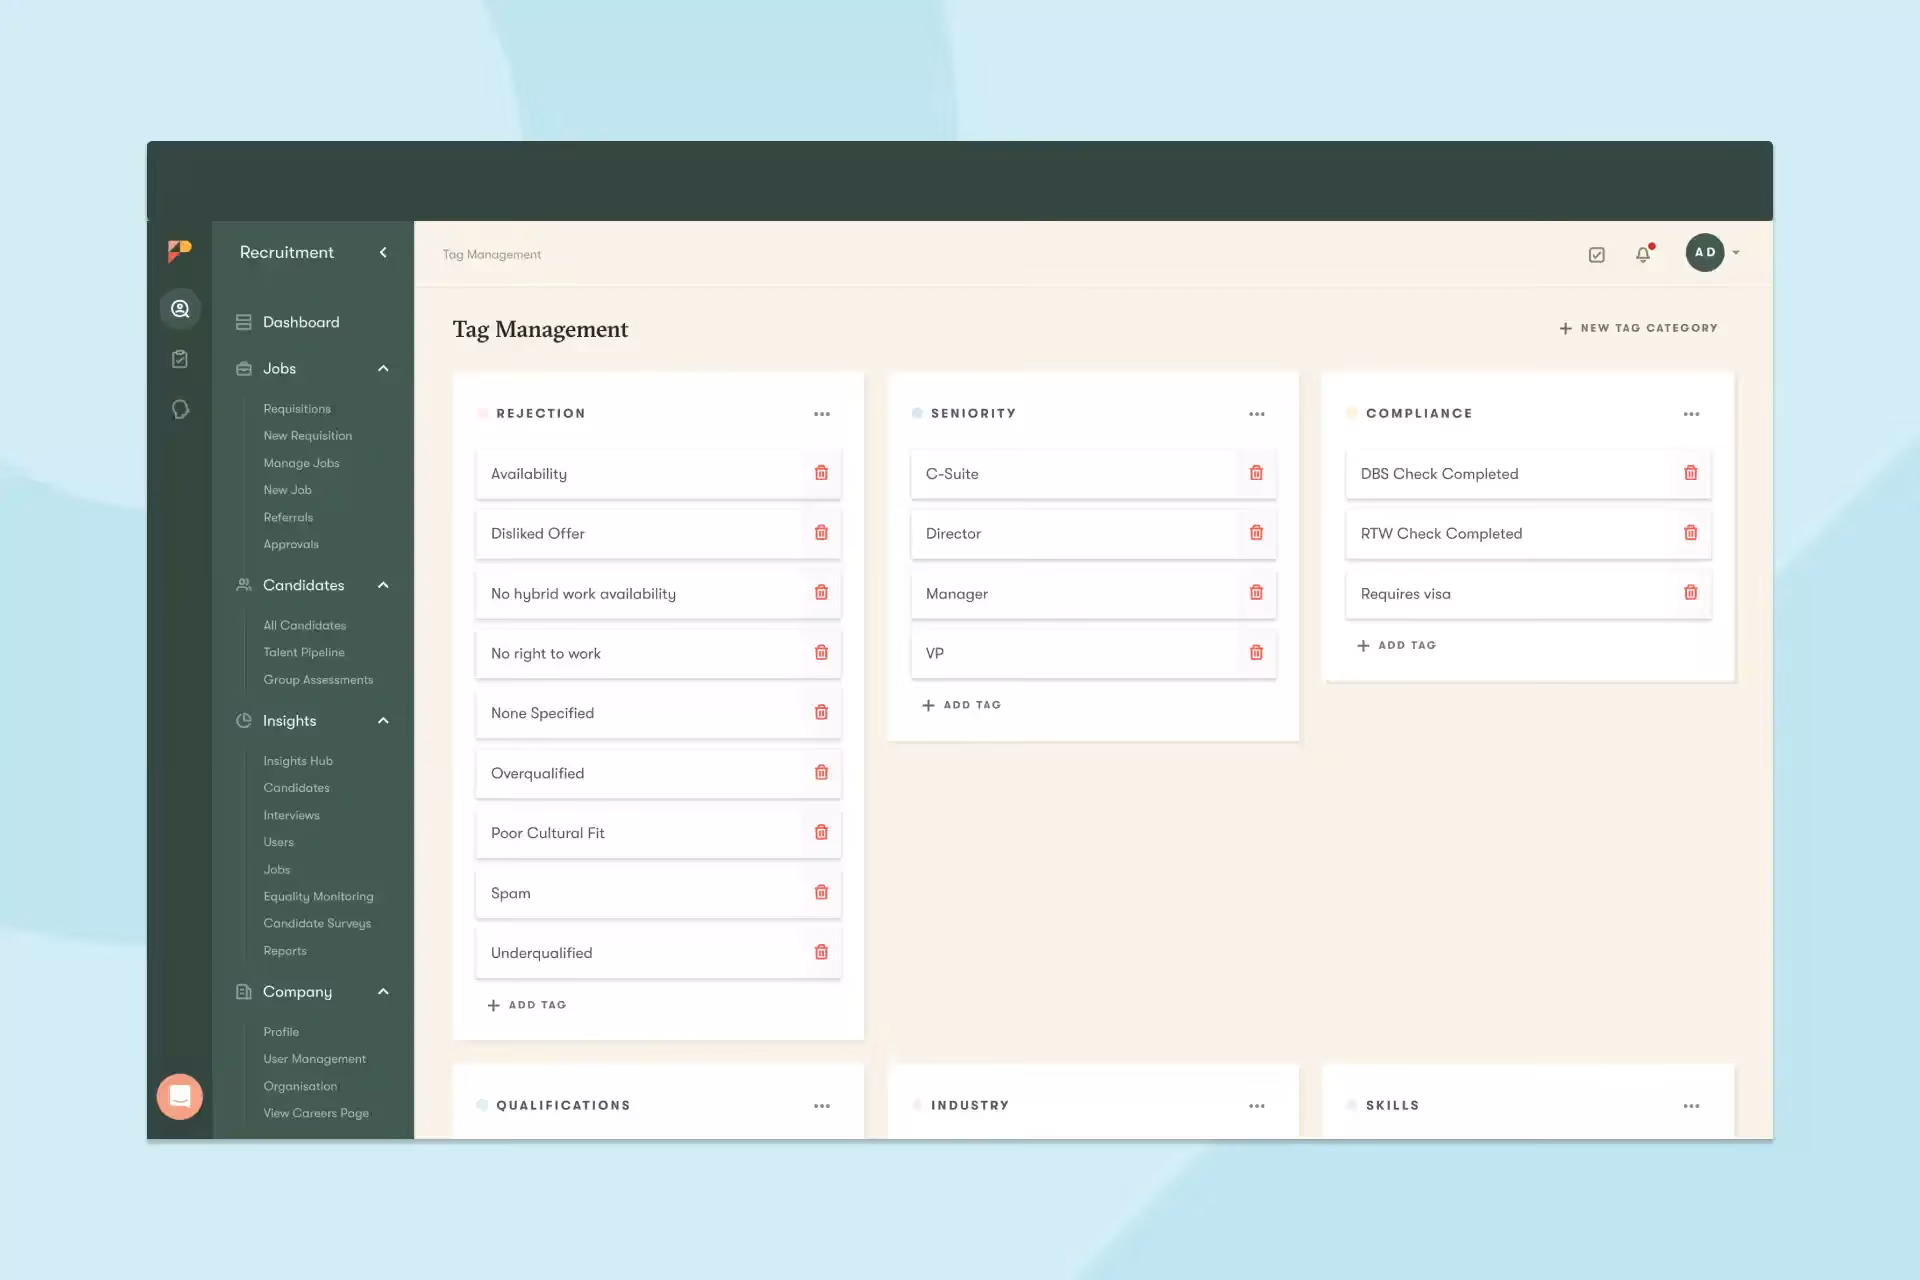
Go to the Tag Management panel and review any existing tags that you may have.
Clean up duplicates and make sure to tag everyone relevant with the same tag before deleting previous ones.
For example, if you’ve decided to use “Speculative Applications” as your standard tag, check for any variations like “speculative” or “spec app” and update them so everyone uses the same tag.
Create a clear naming convention
Keep your tag names short and standardised. Use consistent words for the same concepts, for example:
Apply tags as soon as a candidate enters your system: at application, sourcing, or review stage, so they’re ready for future Pools. You can do this manually or automate it within Pinpoint.
You don’t need thousands of tags. A set that every recruiter understands will always perform better than a complex one that no one remembers to use.
A consistent approach to naming and tagging makes Talent Pools something the whole team can rely on. If your team can’t understand a Pool in three seconds, they won’t use it, and the upkeep will fall back on one person.
The first mistake teams often make with Talent Pools is trying to do too much too soon. They set up ten different Pools, fill them half-heartedly, and within a few weeks, no one knows what’s in them or which ones to use.
This is exactly what we want to avoid. Which is why we recommend starting with just two or three Pools that have a high impact.
Once your team sees how easy it is to hire from those, you’ll have the confidence and buy-in to expand further.

Here are the three talent Pools that we will be working with throughout this guide:
Silver Medalists is how we refer to the candidates who made it to the final stages of a process but weren’t hired. You likely have them yourself, the people you’d happily have taken if you’d had another role open.
They’re already qualified, they’ve already shown interest, and in many cases, they’ve already been through interviews and assessments.
But without a Pool, those candidates disappear into the system, and six months later, you’re starting from zero when a similar role opens.
With a Silver Medalist Pool, you can surface them instantly, skip the early screening, and move straight into interviews.
Speculative Applicants are the people you’ve found through LinkedIn, referrals, events, or those who sent in a speculative application.
Often, they’re strong, but they don’t match an open role at the time. Without a Pool, you probably have them sitting in a spreadsheet or inbox, and in the worst-case scenario, the person who created the list will leave your team, and then it gets lost.
With a Sourced/Speculative Pool, every interesting person you meet has a place to go. When a relevant role opens, you don’t need to start prospecting from scratch; you already have a list of warm contacts who know your brand.
Former employees are often overlooked, but they can be one of your strongest talent sources.
At Pinpoint, we’ve rehired former employees multiple times. They already know your culture, they’re proven performers, and even if you reach out and they aren’t looking to come back themselves, they’re likely to recommend people from their network.
Without an Alumni Pool, those relationships fade as soon as someone leaves. With one, you can keep in touch, send updates, and re-engage them when the right opportunity opens.
These Pools are high value because they’re filled with people you already know and like. They’re also low effort, since you don’t need to invent new processes to get them started. And, most importantly, they show quick ROI. The first time you hire from one of these Pools instead of advertising, you’ll save weeks of effort and a chunk of budget.
Once you’ve identified your first few Pools, it’s time to bring them to life inside Pinpoint. Go to your Talent Pipeline, select + New Talent Pool, and give it a name and short description that makes its purpose clear to everyone on the team.

From there, set your conditions. You might decide that your Silver Medalist Pool should include anyone tagged Silver Medalist who reached Final Interview, or that your Speculative Pool should automatically group candidates tagged Sourced or Speculative Application within a certain department.
The structure is flexible, so build it around the logic your team already uses.
Once you’ve saved the Pool, Pinpoint keeps it up to date for you. Whenever a candidate meets those conditions, they’ll be added automatically from now on.
Now that your tags are in place and your first Pools are live, it’s time to start adding people.
This first setup takes a little time, but it’s a one-off effort that pays back every time you hire. Once you’ve built a clean foundation, your Pools will start filling and updating themselves.
You can add candidates to your Pools in two ways: by tagging or manually adding. Most teams use tagging for almost everything, and only add candidates manually when they need to make quick exceptions.
Tags are what connect candidates to your Pools. When you tag someone with the right criteria, Pinpoint automatically adds them to the matching Pool.
For example:
Once tagged, they’ll appear in the correct Pool automatically and stay there as long as they meet your conditions.
Sometimes, you’ll have candidates who should be in a Pool but don’t yet meet an existing rule or tag condition. In those cases, you can add them manually from the Candidate Dashboard by searching for their name and selecting Add to Pool.
We still recommend tagging them at the same time, so future updates and automations continue to work correctly.

When you introduce new tags for the first time (like creating a Final Interview tag for Silver Medalists), you’ll need to go back and tag your past candidates manually. Once those tags are applied, any new candidate who earns the same tag will be added to the Pool automatically.
It’s a short-term setup task that ensures everything connects properly from the start. Once that’s done, automation will handle the rest.
If everyone’s responsible for keeping Pools updated, no one is. Just like a poorly organized spreadsheet, unkept Pools go stale.
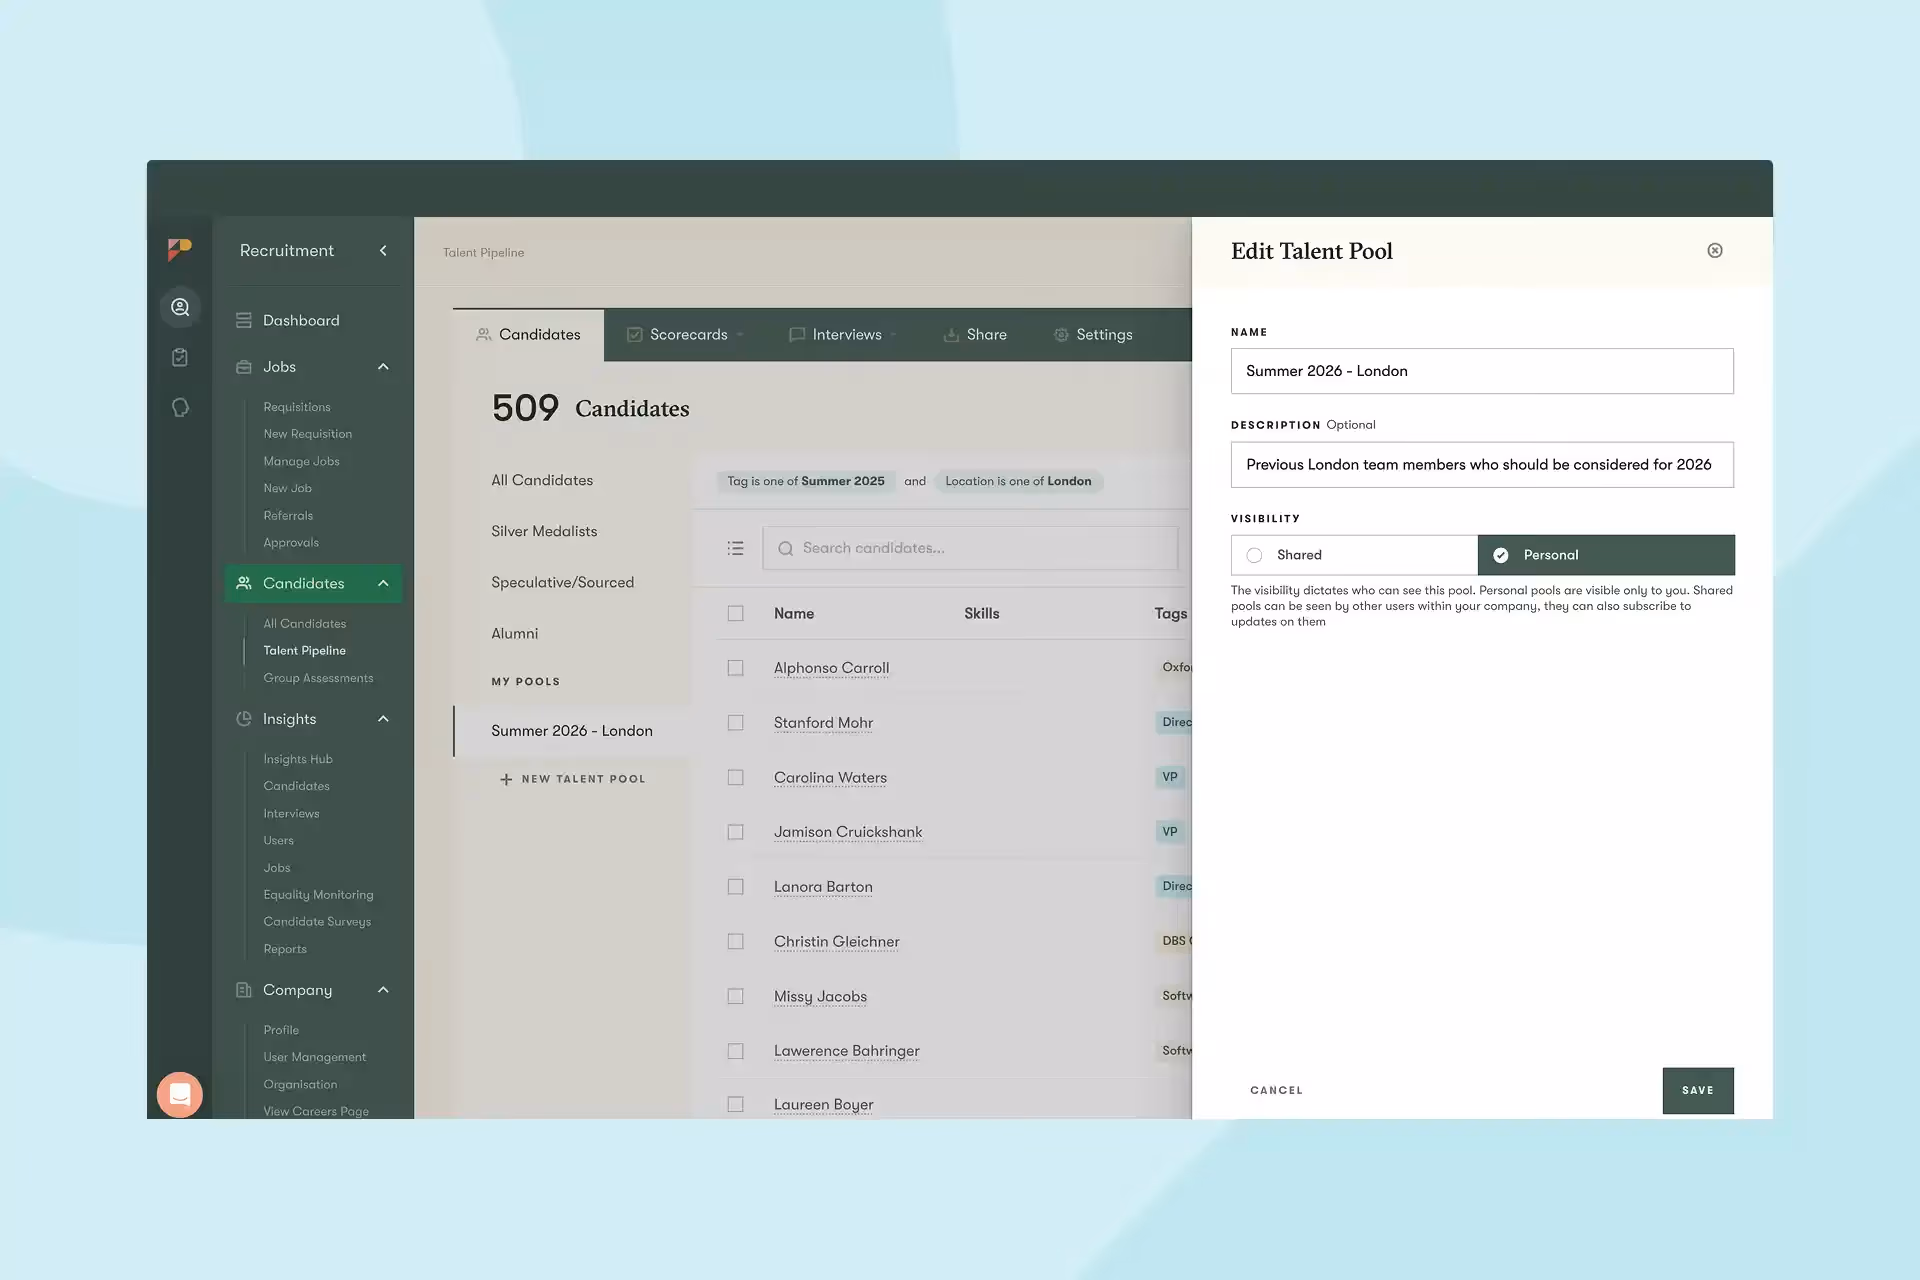
If you’re part of a wider recruitment or talent acquisition team, Pools and tags won’t just be used by you. When you set up a new Talent Pool, you can choose whether to share or keep it personal.
We consider team-wide, shared Pools to be your high-value Pools that need to stay accurate all year round. Silver Medalists, Speculative Candidates, and Alumni are good examples.
They’re usually set up with tags and conditions so that new candidates are added automatically. Because everyone uses them, we recommend having a named owner to keep things running smoothly.
How ownership could work for shared Pools:
These are personal lists that recruiters build for their own sourcing or nurturing, such as event leads, referrals, or specialist talent for niche roles.
They are more flexible, but it’s still worth following shared naming and tagging rules so nothing gets lost or duplicated.
When every Pool has a clear owner, the data stays accurate, and the team knows they can rely on it. Recruiters can show impact through hires made from Pools, and leaders get full visibility of how the system is being used.
As we’ve touched on, when you’re the only person using Talent Pools, it’s easy to keep things consistent in your head. But the moment more recruiters get involved, things start to drift.
That’s why documentation matters. At enterprise scale, we know you don’t need yet another process for process’s sake. But that’s not what this is; we just want you to set up Talent Pools in a way that maintains consistency and makes it easy for new team members to get up to speed quickly. And the good news is you don’t need to write a novel. A single one-pager is enough.
Keep it somewhere your team already works (Notion, Confluence, shared Drive, or your Pinpoint knowledge base) so it’s visible and easy to follow. If it’s buried, no one will use it.
If you put in the time, Talent Pools will change how you hire.
A well-structured Pool means you never have to start a search from scratch. Instead of posting a job and waiting, you will already have a group of people you know and trust.
There are three principles we recommend you always keep in mind:
It’s tempting to create Pools for every scenario straight away. The reality is that most of those won’t get used. Begin with a few that deliver clear results, like Silver Medalists, Speculative candidates, and Alumni. Once you’ve made a hire from one of these, you’ll have the proof you need to build more.
Pools only work if everyone on the team understands them. That means using clear names, shared tags, and assigning ownership so nothing slips through the cracks. A Pool that is inconsistent or unclear quickly becomes one that people stop relying on.
A Pool isn’t finished once you create it. It becomes stronger every time you review, tidy, and nurture it. A short regular check-in and some simple documentation keep Pools healthy and ensure they grow in value over time.
Keep these principles at the front of your mind, and Talent Pools will become a core part of your hiring strategy.
PHEW. You’ve put the effort in, the tags are up to date, the automation is running… but your favorite candidates aren’t replying when you get in touch.
Pools only work if the people in them stay interested. Our next chapter covers how to use Talent Pools for seasonal rehiring, or you can jump to Chapter 4 to learn how to keep your candidates warm for when the next role opens.
Part 1
Introduction to Talent Pools
Part 3
How to set up your Talent Pools for seasonal rehiring
With over seven years in B2B SaaS, Alice creates data-driven content that makes complex topics simple and engaging. She believes every good story (no matter how dry or technical) should feel human, useful, and built on insight.
